Blog

A couple of weeks ago, the Moto 360 went Ā on sale here in Canada. I got up at 5am and hit the internet. My intent was to reserve one in a local store so that I could go and pick it up later that day, but I was out of luck there. Instead I ordered one from Telus.com and it arrived in the mail two days later.

I’m not a tech reviewer – not much of a writer either, for that matter – but I wanted to post to talk about my first impressions during the week and a half I’ve had this thing on my wrist.

When you take the device out of the box and fire it up it takes you through a few brief setup steps, a quick usage tutorial, and then that’s really it. If I had to describe my first 10 minutes with this $280 device in a single word then I’d go with “underwhelming.”

It doesn’t take long, however, to figure out that’s the beauty of the 360 (and, I would assume, all Android Wear devices): this is, first and foremost, a watch. It doesn’t try to be a computer on your wrist, and nor should it.

Aside from telling the time, the functionality my watch provides is more or less just another screen on which to view my Google Now cards and Android notifications, but in practice this is more useful than I ever thought it would be, and I am a huge fan as a result.

When I get a text or an email, or even a Lync message, a quick glance at my wrist is all it takes for me to decide if it’s something important enough for me to take my phone out of my pocket (or maybe even sit down in front of my computer), or if it’s something that can wait. If I want to open the message (or whatever) on my phone then a quick swipe left and a tap is all it takes – when I get my phone out, the relevant content is already on the screen.

If a quick (one or two word) reply is all that’s needed then I can just talk into my watch. I don’t know that I’d do this in public necessarily, but it is actually a useful function despite my knee-jerk initial opinion about it.

The watch face itself is configurable and there are several designs to choose from. I’ve gone for “classic,” a simple watch face that displays free/busy information from my calendar in a subtle, unobtrusive way.

Talking of my calendar, this is yet another killer feature for me. Being able to see details of my next meeting at a glance (and being able to swipe to see the upcoming stuff that follows it) is hugely useful (although again, I didn’t realize how use useful it would be until I had it).

Battery life has been a talking point in early Moto 360 reviews, but I have no concerns in this area. I have ambient mode turned on, and when take my watch off at the end of the day it usually has 30%-40% battery remaining. It certainly requires charging every day, but that’s fine by me.

So should you get one? Well I love mine and I’m glad I bought it. I recognize that this is a first-generation device though. It will be followed, no doubt, by versions with improved functionality, better displays, better battery life… in a year or so there will probably be smartwatches available that make my watch look like a relic of time gone by. If you’re not OK with that then wait until version 2 hits the shelves. For me, I’ll consider upgrading when that happens but the functionality I get from this model is worth the money to me, even if it turns out that I change to a newer model in 18 months time. If you think in the same (geeky) way as me, get your chequebook out and snap one of these things up. I’d recommend it to anybody.

Let me know in the comments if you have questions about it! I’d be happy to answer them.

Blog

CloudFlare Adds SSL To All Customers In Advance Of Googleā€™s Focus OnĀ Security

I’ve written recently about SSL and how you can enable it on your website without spending a lot of (or even any) money. I’m a big fan of Cloudflare and their free service offering, and this feature just makes it better still.

CloudFlare Adds SSL To All Customers In Advance Of Googleā€™s Focus OnĀ Security

Blog

Publicly Trusted SSL on the Cheap

Last week I wrote about how to create a self-signed SSL certificate for your website. It turned out to be one of my popular posts, and the process turned out to be remarkably easy: you run one single command, make a quick change to your webserver configuration and youā€™re done.

Our self-signed certificate worked great for encrypting the connection between our browser and the webserver, but as I mentioned thatā€™s only half the SSL story. Our certificate wasnā€™t trusted by our operating system, which means it couldnā€™t be used by our browser to confirm the identity of the server weā€™d connected to, which in turns means that visitors to our website are greeted with a big, bold ā€œyour connection is not secureā€ error message.

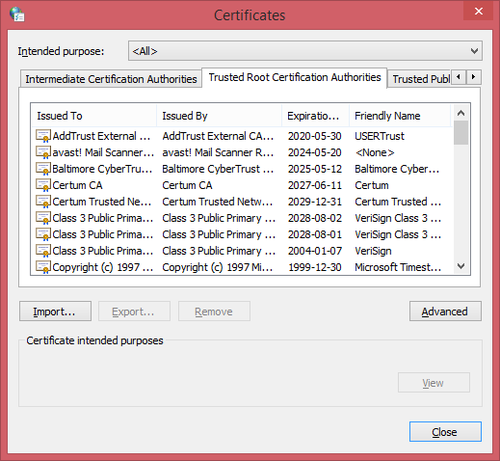
Our browser knows whether or not it can trust a given SSL certificate through a hierarchical structure. Iā€™m glossing over some details, but essentially our operating system comes with a listed of trusted ā€œrootā€ certificates. The owners of these root certificates can produce certificates for their customers much as I produced one for myself last week. The difference is that thereā€™s a mechanism for traceability here ā€“ the certificates they produce are trusted, because our browser can trace things back to the root certificate that it already knows to be good.

image

Iā€™m not suggesting thereā€™s some kind of conspiracy at play here, but it seems to me the owners of these root certificates have a metaphorical license to print money. They can create something out of nothing with, in essence, a single command, and sell it for a value they determine. I might be OK with that if they hadnā€™t determined that the value is so insanely high.

Luckily for us there are market forces at play in this whole story, and we donā€™t have to pony up the $1,500 Symantec are asking to secure our website traffic. Weā€™re going to do it for free. Read on!

SSL Certificates and Their Value

Unfortunately, budget-minded certificate providers are few and far between, and the trend appears to be that their either disappearing or eliminating their lowest-cost options in favour of ā€œbetter,ā€ higher-priced ones. NameCheap is a good option if youā€™re looking to minimize costs, with certificates starting at around $10 at the time of writing.

But hereā€™s the question: If you can get an SSL certificate from them for $10, why are Symantec charging $1,500. Is their option 150x better?

Hereā€™s my answer: No.

Symantec would likely argue that point though, as you might imagine. Theyā€™d mention that they put their customers through a more stringent identification process in order to provide an increased level of confidence in their product. They know their customers, and they know theyā€™re only issuing certificates to trustworthy sites. Theyā€™d argue they provide a warranty with their certificates that provides their customers with legal protection against a losses caused by a security breach.

This is all well and good, of course, but does the typical internet user care? Iā€™d propose that the average site visitor ā€“ at best ā€“ notices the green padlock icon in the address bar and proceeds with confidence upon seeing it. How much you, as a site owner, pay to get that padlock icon really makes no difference to the vast majority of your visitors.

That all being said, it of course depends on what your site does. If youā€™re a bank, this is not an area you should be trying to save money in. Take the expensive certificate with the warranty and the legal protection. If you run an e-commerce site and your livelihood depends on your website then maybe donā€™t spend $1,500, but donā€™t accept the reputational risk of using a product with no warranty and limited support. If youā€™re me, though? Whatever, just spend as little money as possible.

Getting a Free SSL Certificate

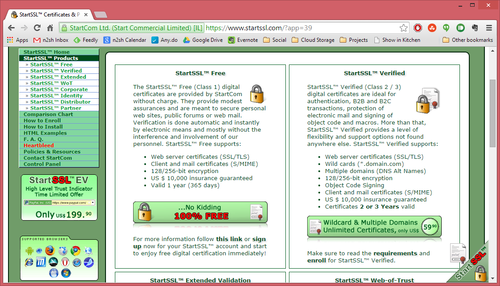
Enter our new best friends at StartSSL. They offer single-site SSL certificates for the extremely reasonable price of free. There are some caveats as you might expect, but none of them are a show-stopper for my purposes. Nevertheless the biggest thing you should consider is that although theyā€™ll issue the certificate for free, you will have to pay if you ever need to revoke it. If you ever suffer a security breach and suspect that your certificate file has fallen into the wrong hands (Iā€™m talking about the equivalent of the server.pem file we created for ourselves last week), it should be revoked to prevent some nefarious person setting up a site that masquerades as yours. If thereā€™s ever another vulnerability similar to the heartbleed bug then the certificate should likewise be revoked.

In a nutshell, this is a risk tolerance question. By taking the free certificate youā€™re betting that nothing bad will happen during the 12-month life of your certificate or that if it does youā€™ll be prepared to accept a whole host of new risks.

Since I was OK with the many drawbacks of using a self-signed certificate, I laugh in the face of risks like the ones mentioned above. If youā€™re different then do your homework and make sure youā€™re getting a product thatā€™s right for you, but if youā€™re like me then tune in next week when I walk through the steps of getting a free certificate issued to me and install it on my server.

image

Blog

When It Comes To Facebook Scale, You Can Throw Out The Rulebook | TechCrunch

I read this techcrunch article this week about hardware engineering at Facebook. The nitty gritty details are only mildly interesting to me, but listen to what Facebook are saying about the culture they’ve created.

“We do it this way because this is the way we’ve always done it?”

Not at Facebook you don’t.

What’s the BPR equivalence? Can I achieve similar results through being a continual advocate for Kaizen as a process improvement methodology, or is this a cultural thing at FB that I can’t replicate on my own?

Get in touchĀ or leave a comment to let me know!

When It Comes To Facebook Scale, You Can Throw Out The Rulebook | TechCrunch

Blog

Single Sign-On (SSO) in PHP

Thereā€™s a project underway in work called single sign-on and identity and access management. Iā€™m not involved in it directly, although by its nature it touches on several things that I am working on at the moment. The goal, as the name implies, is to rid ourselves entirely of multiple sets of credentials: anything we use should have the same login ID and password, whether itā€™s one of our hosted systems (which, to be fair, already behave this way for the most part) or a third-party system like the webapp that we use to deliver training.

Since Iā€™m not directly working on it this project is not really anything more than a blip on my radar, but itā€™s interesting to me because Iā€™m attempting to do a similar thing at home, albeit on an entirely different scale to the large enterprise-wide project thatā€™s I hear about in my professional life.

After the recent upgrade to my home server that Iā€™ve blogged about before I now have several virtual servers included in our home network setup. One of these runs Windows Server 2008 R2, and Iā€™ve made that one a domain controller that all the other computers (and servers) connect to. There are several benefits to this approach, but chief amongst them is a single set of credentials ā€“ I use the same username and password regardless of which of our home computers Iā€™m logging on to, and when I change my password I change it once for it to be effective everywhere.

There are few web services running on our home network which require signing into, such as a web interface for centralized torrent downloads, a file browser, and a simple content management system that pulls everything together into an intranet of sorts. Most of these are PHP-based, and Iā€™m on a mission to add SSO capability to these too.

Iā€™ve discovered two main methods of enabling SSO in PHP that Iā€™ll write about after the break, and my eventual plan is to tie the two methods together into a single cohesive sign-on module that I can reuse. Read on to find out what Iā€™m up to!

LDAP (Lightweight Directory Access Protocol) Authentication

Wikipedia defines LDAP as an open, vendor-neutral, industry standard application protocol for accessing and maintaining distributed directory information services over an Internet Protocol (IP) network.

Thatā€™s a lot of fancy words for saying that LDAP provides an address book (think of the global address listing you see in Outlook, and youā€™re thinking of an LDAP database). PHP has a set of LDAP extensions that can be used to query the address book and retrieve user information, but in the context of authentication, we donā€™t even need to worry about any of that. An LDAP server can (depending on the implementation) be queried anonymously, or we can pass in some credentials with the query to get more detailed information back (again, depending on the implementation).

Itā€™s this last part thatā€™s important. Active Directory on a Windows domain controller is an LDAP server. In PHP, all we have to do is attempt to log on to the LDAP server. If weā€™re successful, itā€™s because the username and password that we input is valid on the domain. Even better, ā€œvalid on the domainā€ in this case means itā€™s an active account, the password is not locked, and all other account-level restrictions (such as a restricted set of logon hours) are considered.

All of this makes using LDAP to test the authenticity of a set of supplied credentials pretty trivial:

<?php
   $username = "testuser"
   $password = "pa55w0rd";

   $domain = "testdomain.local";
   $domaincontroller = "dc1.testdomain.local";

   $ldap = ldap_connect($domaincontroller);
   if ($bind = ldap_bind($ldap, $username."@".$domain, $password)) {
      // user login successful
   } else {
      // user login failed
   }
?>

Thatā€™s all there is to it!

Depending on what you had in mind when you read ā€œSSOā€ in the title of this post though, we may not have met your requirements here. If we meant that the user has a single set of credentials then, fantastic ā€“ they do! But if our intention was to only require that a user enters their single set of credentials once (when they log on to Windows) then weā€™ve fallen short here. The code above requires the username and plaintext password, so weā€™d have to present some kind of web-based login form to the user to request that information and get all this to work.

Enter NT LAN Manager (NTLM) Authentication

If a website (or intranet site) is part of the intranet or trusted zones (found in the Internet Settings control panel applet) then that site is allowed to pass a header requesting NTLM authentication. When it does, windows passes a header back containing some information about the currently logged-in user without the user being prompted for their credentials in any way.

I obtained some simple example code from someone called loune at Siphon9.net and modified so that it doesnā€™t require apache as the webserver. Hereā€™s the PHP:

<?php
   if (!isset($_SERVER['HTTP_AUTHORIZATION'])){
      header('HTTP/1.1 401 Unauthorized');
      header('WWW-Authenticate: NTLM');
      exit;
   }

   $auth = $_SERVER['HTTP_AUTHORIZATION'];

   if (substr($auth,0,5) == 'NTLM ') {
      $msg = base64_decode(substr($auth, 5));
      if (substr($msg, 0, 8) != "NTLMSSPx00")
         die('error header not recognised');

      if ($msg[8] == "x01") {
         $msg2 = "NTLMSSPx00x02x00x00x00".
            "x00x00x00x00". // target name len/alloc
            "x00x00x00x00". // target name offset
            "x01x02x81x00". // flags
            "x00x00x00x00x00x00x00x00". // challenge
            "x00x00x00x00x00x00x00x00". // context
            "x00x00x00x00x00x00x00x00"; // target info len/alloc/offset
            
         header('HTTP/1.1 401 Unauthorized')
         header('WWW-Authenticate: NTLM '.trim(base64_encode($msg2)));
         exit;
      }

      else if ($msg[8] == "x03") {

         function get_msg_str($msg, $start, $unicode = true) {
            $len = (ord($msg[$start+1]) * 256) + ord($msg[$start]);
            $off = (ord($msg[$start+5]) * 256) + ord($msg[$start+4]);
            if ($unicode
               return str_replace("", '', substr($msg, $off, $len));
            else
               return substr($msg, $off, $len);
         }

         $ntlm_user = get_msg_str($msg, 36);
         $ntlm_domain = get_msg_str($msg, 28);
         $ntlm_workstation = get_msg_str($msg, 44);
      }
   }

   echo "You are $ntlm_user from $ntlm_domain/$ntlm_workstation";
?>

Thereā€™s a big problem with this code, and the problem is that itā€™s just decoding the user information from the HTTP header, and assuming that all is good ā€“ thereā€™s no work done to confirm that the header is genuine, and there is a possibility that it could have been faked. We could do some tricks like confirming that the page request is coming from within our local network, but that doesnā€™t really solve the problem ā€“ HTTP headers can be manually defined by an attacker that knows what theyā€™re doing, and what weā€™re doing here is a bit like asking for a username and then just trusting that the user is who they say they are without doing any further authentication.

Combining the Two Approaches

Included in the NTLM authorization header that gets sent to the webserver during the passwordless authentication interaction described above is an MD4 hash of the userā€™s password. A newer version of louneā€™s code retrieves this and confirms its validity using samba. Unfortunately that setup wonā€™t work for me ā€“ my intranet webserver is running a customized version of samba that comes with the software I use to manage the linux computers that are attached to my domain, and this trick just flat-out fails.

However, if I have a plaintext version of the userā€™s password then I can use PHP to generate an MD4 hash of it for the purposes of comparison. So hereā€™s my plan:

Scenario A: The first time a user comes to my webapp weā€™ll get their credentials using NTLM, including the MD4 hash of their password. Since we wonā€™t know if this hash is valid, weā€™ll present the user with a screen asking them to confirm their password (but not their username). When they input it, weā€™ll confirm that their username and password combo is good using LDAP, and also generate an MD4 hash of the plaintext password that they entered to compare with what NTLM gave us. If nothing weird is going on everything should match. At this point weā€™ll store the MD4 password hash for future.

Scenario B: When a user returns to our webapp weā€™ll get their credentials using NTLM as before, and compare the hash NTLM gave us to our stored hash from their previous visit. If they match, weā€™re good, and thereā€™s no need to ask the user to enter their password.

Scenario C: If the NTLM hash and the stored hash donā€™t match then the most likely scenario is that the user has changed their Windows password since their previous visit to our webapp. In that case weā€™ll throw out the stored hash and start again at Scenario A.

If anyone knows of a better approach (is there a centrify Kerberos tool that I could use to get an MD4 hash of the userā€™s password for the purposes of my comparison, for example?) then please let me know! Iā€™d love to be able to achieve true passwordless SSO, but so far I canā€™t a method for doing so unless I switch my webserver from linux to Windows, and I donā€™t want to do that.

Blog

Creating a Self-Signed SSL Certificate for Lighttpd

Youā€™ve probably heard of SSL, or at least know it from either the https:// prefix that you see when browsing certain websites or the padlock icon in your browserā€™s address bar that goes along with it.

image

You probably also know that this iconā€™s presence is an absolute must when youā€™re doing sensitive things on the internet, like online banking. Really though you should consider it a must on any site where youā€™re entering information that you wouldnā€™t want falling into the wrong hands ā€“ including your username and password for the site itself and anything you do on the site once you have logged in.

SSL does two important things: It encrypts the connection between your browser and the siteā€™s webserver, meaning that if somebody had the ability to listen in to your internet traffic (which is actually frighteningly easy, especially if you’re using a public WiFi hotspot) then they wonā€™t actually see any of your important personal details. SSL also provides identity verification for websites in order to thwart a more complex attack where your web traffic is somehow redirected to a fake version of the site. Today weā€™re going to tackle only the first part ā€“ encrypting the connection between the browser and my webserver, which is running lighttpd.

Recently Iā€™ve created a web interface that allows me access to my documents from anywhere on the web. To log in I have to enter my user ID and password for my home network, and once Iā€™m logged in I may want to open a file that includes some sensitive information. This whole interaction is something that should be protected end to end by SSL, so thatā€™s precisely what Iā€™m going to do.

Creating an SSL Certificate

Of the two things SSL can do for us (securing a connection and confirming the identity of the webserver weā€™re connected to), the first part is actually much easier than you might think. The problem (as weā€™ll discover), is that doing only that first part has some problems that make it unsuitable for a typical public website. More on that later, but in my scenario where I have a website thatā€™s intended only for my use this will be an acceptable solution, and thatā€™s what weā€™re going to do.

On the webserver, navigate to a directory where youā€™re going to store the SSL certificate file. This directory should not be web-accessible. Weā€™re going to use OpenSSL to create our SSL certificate. OpenSSL is unfortunately best known for introducing the heartbleed bug that caused a panic in the not too distant past, so before you proceed make sure the version you have is not affected. The step we’re about to complete actually won’t be impacted even if your server is vulnerable to heartbleed, but the day to day use of any certificate on a vulnerable server is not safe.

Ready? Good. Type the following command:

openssl req -new -x509 -keyout server.pem -out server.pem -days 365 ā€“nodes

OpenSSL will ask a few questions, the answers of which will form a part of the certificate weā€™re generating (and be visible to site visitors, if they choose to go looking for it). Everything is fairly self-explanatory with the possible exception of the Common Name field. Since weā€™re going to be using this certificate for web-based SSL, the Common Name must be the hostname (the full domain name, including the www prefix if you use it) of your website.

Country Name (2 letter code) [AU]:CA
State or Province Name (full name) [Some-State]:Alberta
Locality Name (eg, city) []:Calgary
Organization Name (eg, company) [Internet Widgits Pty Ltd]:JnF.me
Organizational Unit Name (eg, section) []:Hosting and web services
Common Name (eg, YOUR name) []:www.ssl-example.jnf.me
Email Address []:[email protected]

Youā€™ll find that you now have a file called server.pem in your working folder, and thatā€™s it! This is your SSL certificate that will be used to secure the connection.

Enabling SSL in Lighttpd

Now we need to configure our webserver to use SSL with the certificate weā€™ve just generated. As I noted, my webserver is lighttpd. If youā€™re using Apache, IIS, Nginx or something else then the steps you need to follow will be different.

For lighttpd, open up your lighttpd.conf file (typically found in /etc/lighttpd) and adjust your configuration similar to the following:

$SERVER["socket"] == ":80" {
   url.redirect = ("^/(.*)" => "https://www.ssl-example.jnf.me/$1")Ā 
}

$SERVER["socket"] == ":443" 
   ssl.engine = "enable"
   ssl.pemfile = "/path/to/server.pem"
   server.document-root = "/path/to/web-root"
}

The first section identifies any traffic that reaches port 80 on our webserver (http), and redirects the user to the https version of the site. The second section applies to traffic reaching port 443 (https), enables lighttpdā€™s SSL engine and provides the paths to the server.pem file that we generated, and the appropriate content.

Restart lighttpd for the changes to take effect:

sudo /etc/init.d/lighttpd restart

And thatā€™s it! Traffic to our site is now encrypted using SSL.

Identity Verification

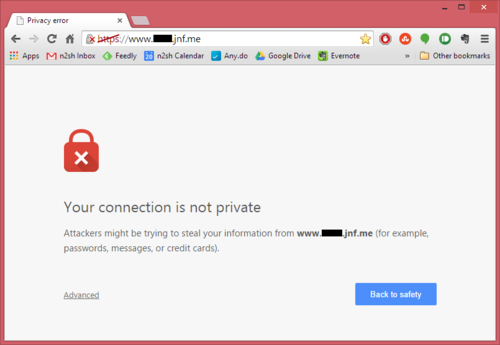
As I alluded to earlier in the article though, thereā€™s a problem. When you navigate to the site in your browser you see (depending on your browser of choice) something similar to the following on your screen.

image

Itā€™s not particularly specific, but clearly Chrome has an issue with our setup.

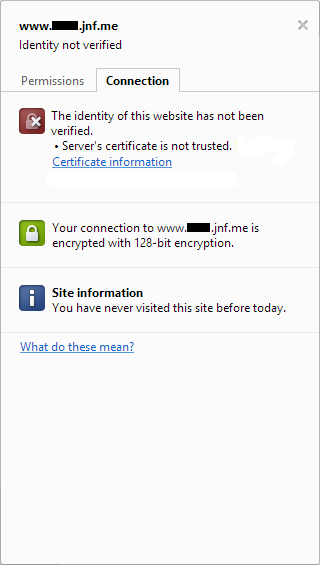
The problem here is the one I alluded to earlier, and if you click the padlock icon in the address bar then Chrome will give you some additional details that show you what I mean.

image

Our connection is indeed secured by SSL as weā€™d hoped, but Chrome has been unable to verify the identity of the website weā€™re connecting to. This is not a surprise ā€“ since we created the SSL certificate ourselves, our browser has no means of knowing if the certificate should be trusted or not. This is why self-signed certificates are not suitable for public, production websites.

Since this is site is going to me for my use only, I can live with it. The important thing is that my connection is encrypted, and if I hit the Advanced link then I have an option to ignore the warnings and proceed to the site. I donā€™t want to do that every time if I can avoid it though, and the solution is to add the siteā€™s SSL certificate to your computerā€™s Trusted Root Certificate Authorities store. Chrome (on Windows) and Internet Explorer both use this same location when checking the validity of SSL certificates, so the easiest way to go about doing this is actually to open the site in Internet Explorer and then complete the following steps which I took from a helpful user on stackoverflow:

  1. Browse to the site whose certificate you want to trust.
  2. When told There is a problem with this website’s security certificate, choose Continue to this website (not recommended).
  3. Click on Certificate Error at the right of the address bar and select View certificates.
  4. Click on Install Certificate… then in the wizard, click Next.
  5. On the next page select Place all certificates in the following store.
  6. Click Browse, select Trusted Root Certification Authorities, and click OK.
  7. Back in the wizard, click Next, then Finish.
  8. If you get a security warning message box, click Yes.
  9. Dismiss the message box with OK.
  10. Restart your computer.
  11. When you return to the site in either internet explorer or Chrome, you should find that the certificate is now trusted.

All done!

Blog

Too Much Planning is Indistinguishable From Procrastination

First of all, sorry about the lack of blogging last week. I was a challenging combination of busy and sick. Close to death, in fact, just ask my girlfriend.

Anyway, let’s get back to business with this interesting lifehacker article I read last week. I’m a little concerned that a project I’m currently assigned to falls into this category – everything is meticulously planned, but nothing of substance ever happens.

Discuss.

Too Much Planning is Indistinguishable From Procrastination