Have you ever come across this snippet of JavaScript before?
try {
   xhr = new XMLHttpRequest();
} catch(e) {
   xhr = new ActiveXObject(“Microsoft.XMLHTTP”);
}
If you haven’t then not to worry, it’s not really the point of this post anyway – but for the uninitiated this is a snippet of JavaScript that prepares an object that will be used to make an ajax request. Ajax is the mechanism by which a webpage can load more data from the server even after the page itself has finished loading, and you find it all over the place.
The reason I bring it up is because of the try… catch construct involved. Essentially it tries to execute the code between the first set of curly braces, and if that fails then it executes the code between the second set instead. In the huge majority of cases the first line of code executes successfully, so why is the second line necessary?
Microsoft. And more specifically, Internet Explorer 6.
For anybody who makes things that live on the web, supporting Internet Explorer 6 is an absolute chore. It does things differently to other (read “standards complaint”) browsers, and you end up having to create everything twice and put a bunch of hacks in place to make your site work with it. The block of code above is a prime example: every other browser has the XMLHttpRequest object built into their JavaScript implementation, but for Microsoft you have to use an ActiveX object instead.
More recent versions of Internet Explorer are much better in this regard, and these days frameworks like jQuery take care of any little annoyances like this that remain so it’s not as big a deal as it was a decade ago, but that’s not the point of this post either.
The point is that ActiveX remains a part of Internet Explorer to this day, and despite the fact that many web programmers know it primarily as a result of the XMLHttp annoyance described above, it does have its uses. So let’s exploit it.
The Downside
If you’ve ever created web content then you’ll know the importance of standards compliance. Writing compliant markup and code helps to ensure that your site works in whatever browser software your end users happen to be using. That’s a good thing.
ActiveX exists only within Internet Explorer. If visitors to your SharePoint webapp are using another browser such as Chrome or Firefox then none of the following example code is going to work for them. The best we’ll be able to do is detect that it hasn’t worked and have our app react in an appropriate way, maybe with a warning message or something similar.
If we were creating something publicly accessible for consumption by a wide variety of internet users then this would be a deal breaker, but in the context of an app built atop SharePoint where all the users are within the four (physical or otherwise) walls of your organization? It might be fine. If your organization is like the one I work for then everybody is using Internet Explorer anyway, because that’s the browser installed on your computer when IT deliver it, and getting them to install an alternative is like pulling teeth.
OK, So What is This ActiveX Thing?
Wikipedia sums it up pretty nicely, including condensing my previous three paragraphs down into a single sentence.
Many Microsoft Windows applications — including many of those from Microsoft itself, such as Internet Explorer, Microsoft Office, Microsoft Visual Studio, and Windows Media Player — use ActiveX controls to build their feature-set and also encapsulate their own functionality as ActiveX controls which can then be embedded into other applications. Internet Explorer also allows the embedding of ActiveX controls in web pages.
However, ActiveX will not work on all platforms, so using ActiveX controls to implement essential functionality of a web page restricts its usefulness.
In other words, one of the things we can use ActiveX for is to take the functionality of a Microsoft application and embed it into a web page. I’m going to put together a fairly simple example, and I’m going to use Excel. Let’s dive in!
The HTML
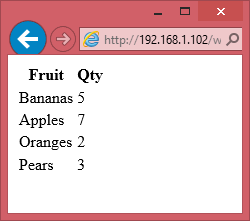
I’m going to build a simple table in HTML. The data in the table could come from anywhere, such as a subset of some SharePoint-based dataset or other pulled together using some of the techniques we’ve looked at previously, or a script executed server-side if you have the ability to create such a thing. For the sake of simplicity though, I’m just going to define in a static manner in my markup – and I’m not going to worry about making it look good.
<table>
   <thead>
      <tr><th>Fruit</th><th>Qty</th></tr>
   </thead>
   <tbody>
      <tr><td>Bananas</td><td>5</td></tr>
      <tr><td>Apples</td><td>7</td></tr>
      <tr><td>Oranges</td><td>2</td></tr>
      <tr><td>Pears</td><td>3</td></tr>
   </tbody>
</table>

The Template
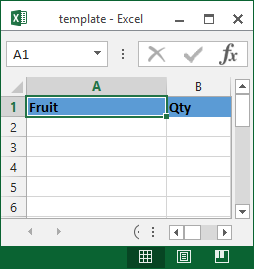
Next, I’m going to define an excel template that we’ll use to place our data into. This could be as detailed or as simple as necessary, so for the purposes of example I’ve gone with simple again. All I’ve done in mine is put headings at the top of column A and B that match the headings in our HTML.

The JavaScript
OK, here’s where the clever bit starts. The first thing we’re going to do is create an ActiveX object pointing to excel, and assign it to a variable so we can reference it again further along in the code.
var exApp = new ActiveXObject('Excel.Application');
Next we’re going to open a new document in excel, based upon our template. Doing this also returns an object that we’ll need again, so we’re going to assign this one to a variable too.
var exDoc = exApp.Workbooks.Add('http://192.168.1.102/web/template.xltx');
It’s important to note here that we have to pass in an absolute reference to the template file – a relative reference is not sufficient because excel has no concept of the location of our webpage. In my test environment the SharePoint server is at 192.168.1.102, but this will undoubtedly be different for you.
At this point, excel is open and has our template loaded, so the next thing to do is iterate over the table in our HTML and plug the data into excel. In general, this is done with the following line of code:
exDoc.ActiveSheet.Cells(1, 1).Value = 'This is row 1, column 1!';
More specifically what we’re going to do is use our old friend jQuery to iterate over the table cells in our HTML page and put them into the right place in excel with the help of a couple of simple counter variables: one for the row we’re targeting, and one for the column. Don’t forget to include a reference to the jQuery library in the document <head> section.
r = 2;
$('table tbody tr').each(function() {
   c = 1;
   $(this).children().each(function() {
      exDoc.ActiveSheet.Cells(r, c).Value = $(this).html();
      c++;
   });
   r++;
});
While we’ve been preparing all this, the Excel window has been invisible to the user. The final step is to make it and its newly imported data appear.
exApp.Visible = true;
Done!
Putting it All Together
The full code of our HTML page is as follows:
<!DOCTYPE html>
<html>
<head>
   <title>Export to Excel Example</title>
   /web/js/jquery-1.11.0.min.js

      $(document).ready(function() {
         $('input#export').click(function() {
            var exApp = new ActiveXObject('Excel.Application');
            var exDoc = exApp.Workbooks.Add('http://192.168.1.102/web/template.xltx');

            r = 2;
            $('table tbody tr').each(function() {
               c = 1;
               $(this).children().each(function() {
                  exDoc.ActiveSheet.Cells(r, c).Value = $(this).html();
                  c++;
               });
               r++;
            });

            exApp.Visible = true;
         });
      });

</head>
<body>
   <table>
      <thead>
         <tr><th>Fruit</th><th>Qty</th></tr>
      </thead>
      <tbody>
         <tr><td>Bananas</td><td>5</td></tr>
         <tr><td>Apples</td><td>7</td></tr>
         <tr><td>Oranges</td><td>2</td></tr>
         <tr><td>Pears</td><td>3</td></tr>
      </tbody>
   </table>

   <input type="button" id="export" value="Export to Excel">
</body>
</html>
Taking it Further
What I’ve put together here is a pretty simple example, but hopefully you can see the value in some of the possibilities this opens up. Getting complex data from a webapp into Excel is actually fairly straightforward.
With a more detailed template to export data into you could prepare webapp data for analysis in excel, create charts, etc, etc.
Enjoy!