Blog

Inky Impression Picture Frame #2: Creating My Node.js App

A couple of weeks ago I posted about picking up an Inky Impression picture frame and taking the initial steps to getting it working with a Node.js app.

That app is definitely not done, but it has continued to take shape over the last couple of weeks. I’ve been holding off on posting about it because – as I said in my original post above – one of the features I wanted was to have sync with a specific folder in my Google Photos account. Google have recently made some changes to their Photos API that in theory make what I want to do impossible.

I came up with an approach that shouldn’t work but somehow does. I came across someone else’s project with similar hardware (that I can’t find the link to right now, sorry) who was using a tool called rclone to sync from a Google Photos album. I’m familiar with rclone, and I use it to back up to my cloud storage provider. Google Photos is one of the providers it works with, so I thought I’d give it a try.

The changes to the Google Photos API that were going to affect me should be having the exact same impact on the rclone software but for some reason that just doesn’t seem to be the case. It’s now been four days since Google supposedly implemented their API changes and my setup is still working šŸ¤ž

Even better, someone has created a Node.js wrapper for rclone that I can simply plug directly into my app as a library.

Here’s my code (which is also available in my git repo for the project):

const rclone = require('rclone.js')
const schedule = require('node-schedule')
const fs = require('fs')
const sharp = require('sharp')
const inky = require('@aeroniemi/inky')

const frame = new inky.Impression73()
const folder = './gallery/'

var ticker = false
var filelist = false

function downloadImgs() {
	console.log('Starting download from Google Photos...')
	const sync = rclone.sync('gphotos:album/Family Room Photo Frame', folder)

	sync.stdout.on('data', function(data) {
		console.log(data.toString())
	})

	sync.on('exit', function() {
		console.log('Synchronized from Google Photos. Loading images...')
		loadImgs()
	})
}

function loadImgs() {
	fs.readdir(folder, (err, files) => {
		if (err || files.length == 0) {
			console.log('No images found. Exiting.')
			process.exit(1)
		} else {
			console.log(files.length + ' images found. Starting album display...')
			filelist = files
			displayAlbum()
		}
	})
}

function displayAlbum() {
	if (filelist.length == 0) loadImgs()
	else {
		imgref = Math.floor(Math.random() * filelist.length)
		imgfile = filelist.splice(imgref, 1)[0]
		console.log('Randomly displaying image ' + (imgref + 1) + ' of ' + (filelist.length + 1) + ' remaining: ' + imgfile)
		displayImage(imgfile)
		ticker = setTimeout(displayAlbum, 1800000)
	}
}

function displayImage(filename) {
	sharp(folder + filename)
	  .resize(800,480)
	  .toFile('output.png', (err, info) => {
		frame.display_png('output.png')
		frame.show()
	})
}

// We start by downloading images. Other functions will be called if this is successful...
downloadImgs()

// Define a cron-job to restart everything at 1:30am (including a refresh of the album)....
schedule.scheduleJob('0 30 1 * * *', function() {
	clearTimeout(ticker)
	console.log('Resetting...')
	downloadImgs()
})

It’s of course still a work in progress. There’s a lot of stuff here that should be a configurable option that I’ve just hardcoded in, and there’s not yet any way to interact with the app, but essentially what it does is pretty straight-forward:

  1. On startup, the code downloads the content of a Google Photos album named ‘Family Room Photo Frame’
  2. It displays a random photo and crosses that one off the list, waits 30 minutes, picks another random photo from what’s left, displays it, and repeats the cycle until all photos have been shown.
  3. When there are no photos left it reloads the list and starts the cycle over
  4. Every morning at 1:30am it stops what it’s doing and starts everything over, including doing a refresh of what’s in the Google Photos album

To set it up you mostly just need to clone the git repo and run it, but there are a couple of important extra steps. You need to run npx rclone config and set up an rclone remote named gphotos to connect to your Google Photos account. Inside that account you either need to have an album named Family Room Photo Frame or you need to edit line 15 of the code to match an album that you do have. It can be a shared album, so others in the household can contribute to it too.

I then used pm2, which is my favourite tool for managing the running of node apps, to start the app. PM2 takes care of both running the app as a service of sorts on system startup, and will also automatically restart the app in the event that it crashes.

More to come, but I’m already loving this thing.
Blog

New Nerdy Project: Inky Impression Picture Frame

The other day (coincidentally, on Pi Day) I posted on Mastodon about picking up some new Raspberry Pi and accessories for a couple of new projects.

Well, this is the first one! I’ve constructed an e-ink picture frame.

Over on YouTube, AKZ Dev has recently posted a few videos about the hardware I’m using: a 7.3″ e-ink display from Pimoroni called the Inky Impression.

He’s also been writing some python software to power it, and while I’m sure what he’s created is great the point of this project for me is as a learning exercise, so I’ll be writing my own code.

Hardware

First of all though, I had to assemble the hardware. This is pretty straight-forward:

I may still get a wooden picture frame to put this in for better aesthetics, but for now my 3D printed version is working great. You put the Pi into its 3D printed case, the display into its 3D printed case, and then you plug them together and give it some power. Done!

I wish that the colours on the display were a little more vibrant than they are (this aspect of the display is not quite as good as I was expecting it to be) and I wish it updated a little more quickly (this is exactly as I expected it to be, and it takes about 30 seconds), but on the whole I like this e-ink display much more than I like backlit LCD photo frames.

Software

I downloaded my new favourite OS for the Raspberry Pi, DietPi, as a base and let it guide me through the setup process to connect to WiFi, set the timezone, the usual stuff. A couple of particular options to pay attention to during setup were to enable I2C and SPI, which is how the Pi communicates with the screen through the GPIO header, and install a NodeJS environment which I did simply by selecting it from the DietPi software installer.

Pimoroni suggests Python as the language to use and offers a Python library for that purpose, but I have limited experience in Python and I’m much more comfortable with Node, so that’s what I’m going to use if I can.

As a proof of concept, I wrote a half-dozen lines of code that take an input image, resize and crop it to fit the display, and render it on the screen. I’m using the sharp library for the image manipulation, and the inky library from aeroniemi to interact with the display.

const sharp = require('sharp')
const inky = require('@aeroniemi/inky')
const frame = new inky.Impression73()
sharp('../img/OriginalImage.jpg')
  .resize(800, 480)
  .toFile('output.png', (err, info) => {
	frame.display_png('output.png')
	frame.show()
})

So far this is working great. I obviously plan to extend this, and I’ll make the eventual code available if anyone else wants to replicate what I’ve done. Features I’m currently thinking about are:

  • Connect to a specific album in my Google Photos account
  • Rotate through the images in the album, updating every five minutes or so
  • Ability to skip forward and back using the buttons on the side of the display, maybe
  • Ability to skip forward and back by issuing a command over MQTT (of course I’m integrating this thing with Home Assistant)
  • Ability to display some specific content (other than the usual album) based on an MQTT command or button press… what I’m thinking of here is my WiFi username and password that I can interrupt the slideshow to display for guests along with a QR code with the connection details
  • Maybe the ability to display a webpage by loading it headlessly and taking a screenshot (I believe AKZ Dev’s software can do this and it seems like it opens up lots of possibilities)
  • Maybe a REST API in case I want to use that rather than MQTT

This’ll all take me some time and I’m not in a rush, but I’ll post more as I work on it!

Shrapnel

Earlier in the week I wrote a blog post about how I set up my Office display using a Raspberry Pi 3B+

Today I picked up a Pi 4 and a Pi Zero 2 W for other projects (watch this space!) and I was curious how they’d perform. So I raced them. From the time I press the “power on” button on my TV remote to the time they’re displaying a webpage.

DeviceTime
Raspberry Pi 3B+1:05
Raspberry Pi Zero 2 W1:25 (+20 secs)
Raspberry Pi 4B (4gb)0:49 (-16 secs)

This is not super-scientific. I think the 3B+ is usually faster except it took longer than usual to obtain an IP address during its boot process. šŸ¤·šŸ»ā€ā™‚ļø

What was most interesting to me was the differences between the 3B+ and the Zero 2W: the initial parts of the Zero’s boot process were quicker than the 3B+, but as soon as it got into dealing with graphics and opening the browser it slowed down dramatically. Even changing from one screen to another in my dashboard and reloading page elements were slow enough that I would need to change my dashboard layout. It really wasn’t performant enough for what I’m doing.

The Pi 4, unsurprisingly, performed great – although the difference between the 3B+ and the 4 wasn’t as big as I thought it would be. The Pi 4 is also too power hungry to be powered by my TV’s USB port, which is a really nice feature of my setup.

Whether by luck or judgement, the setup I have is the one I’d recommend if you want to do something similar. I’m almost tempted to buy more Pi 3s in case I want to replicate it somewhere else in the house.

Blog

How to build a dashboard display with a Raspberry Pi

Skip intro >>

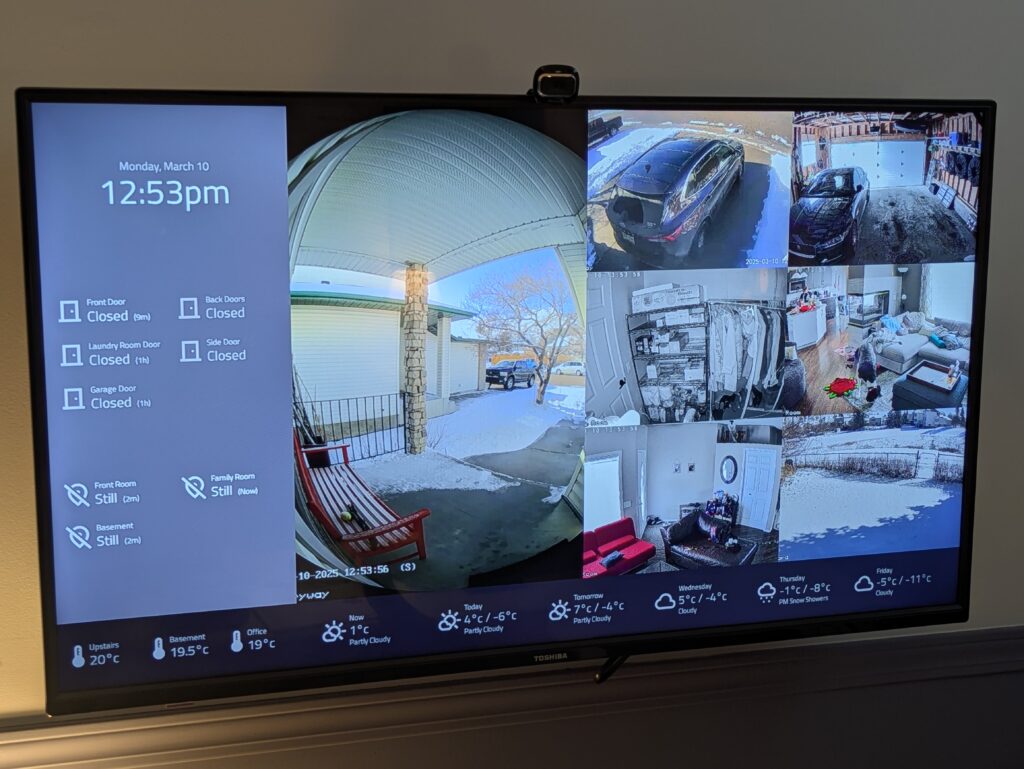
In my office I have a TV on the wall that shows me some pertinent info about whatā€™s going on with our house (thanks to Home Assistant and our array of Smart Home sensors) and the weather, and rotates the display between my calendar, a Google Map with the local traffic overlay, and a view of our security cameras.

Iā€™ve had it for many years and I set it up by (mostly) following a 2016 guide.

The whole thing runs on a Raspberry Pi 3b which I love because I can power it using the USB port built into my TV. The low-power hardware makes optimization critical, hence why the Pi is set up with just enough software to run a lightweight web browser and nothing more.

Iā€™ve recently been on a bit of a journey of switching to Linux for almost all my computing – more to come on that in a future post – which has led me to go through all my devices one by one and get them set up the way I wanted. That inspired me to take a crack at the office Pi too.

It was working just fine before I touched it so I wasnā€™t necessarily expecting to make any changes, but I thought it might be good to see if the software options identified nine years ago are still the most optimal.

No theyā€™re not as it turns out, so hereā€™s my updated guide on setting up a Raspberry Pi to display a web page (and nothing more, nothing less).

The Operating System

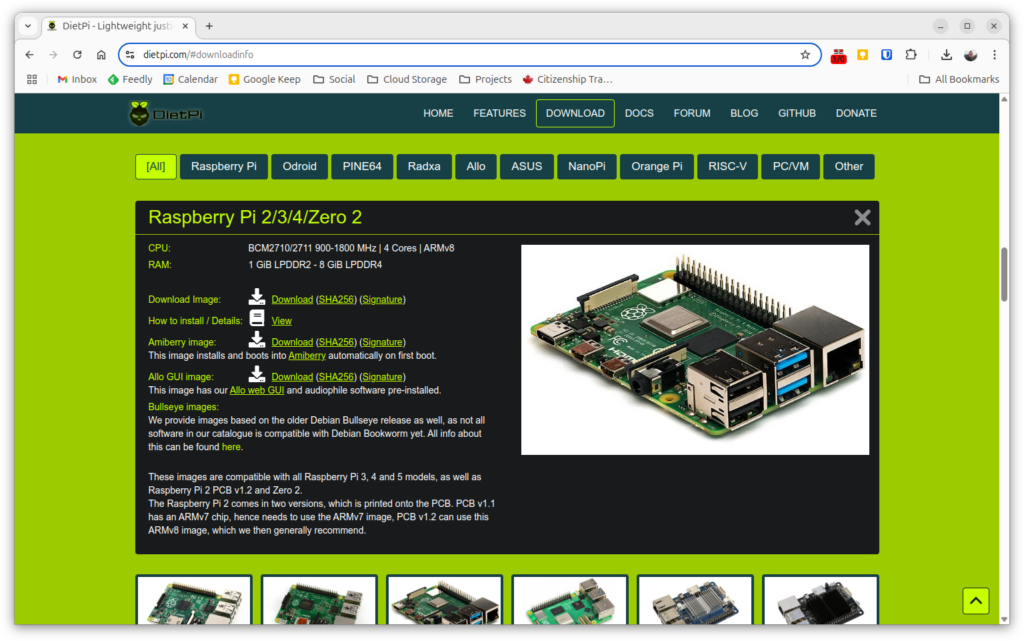
My first change was the base operating system. I switched to DietPi. Download the image for your particular device and install it. There are instructions on the DietPi site if you need them.

Work through the DietPi setup process that automatically launches when you first boot the drive and log in, in particular:

  • Set the localization options (keyboard layout, system locale, timezone)
  • Connect to the internet – in my case I used the Pi’s built-in WiFi – and optional but recommended: disable any connections you won’t be using (e.g. wired Ethernet) so they don’t slow the boot process
  • Enable SSH if you want it
  • Set autologin as root – generally it would be good practice not to use the superuser account for day to day operation and instead set up another account with only the privileges needed, but this setup is so basic we’re not going to worry about it
  • Don’t install any of the software packages – we’re going to carefully install only what we need

For some reason my networking settings didn’t take effect on first setup and I had to reboot and repeat that part of the setup by launching dietpi-config from the command line.

The Software

Our goal with the software we install is two-fold:

  1. If we don’t absolutely need a piece of software, we’re not installing it
  2. We want the software we are going to install to be as lightweight as possible

All we want to do is display a web page on a display. We don’t even really need users to interact with our system. To get this done we’re going to need an X server, a window manager, a web browser and couple of utilities to tie everything together. Let’s get it installed:

apt update
apt upgrade
apt install xserver-xorg x11-xserver-utils dwm surf xinit unclutter

We’re using the X.Org X server, the dwm window manager and surf browser (both from suckless.org), and we’re installing unclutter to hide the mouse pointer when it isn’t in use.

Configuration

First we’re going to create a startup script: nano /root/startdisplay.sh

#!/bin/bash
# Disable DPMS (Energy Star) features.
xset -dpms
# Disable screen saver
xset s off
# Don't blank the video device
xset s noblank
# Allow quitting the X server with CTRL-ATL-Backspace
setxkbmap -option terminate:ctrl_alt_bksp
# Disable the mouse pointer
unclutter &
# Run window manager
dwm &
# Run browser in full-screen mode
surf -F https://www.google.com

Replace https://www.google.com above with the URL of your dashboard, then press Ctrl-O to save the file followed by Ctrl-X to exit nano. Next, make the script executable:

chmod +x /root/startdisplay.sh

Finally, edit /root/.bashrc and add the following three lines at the end:

if [ -z "${SSH_TTY}" ]; then
  xinit ~/startdisplay.sh
fi

This will start X and run our startdisplay script when the root user logs in directly to the device, but not if they’re logging in over SSH (where it wouldn’t work anyway).

And that’s it, done! Reboot your Pi and enjoy your display.

My Pi3B takes around 45 seconds from power on to the point where it’s displaying my dashboard web page, which is less than half the time the previous software setup took (the hardware has remained the same throughout).

The Exciting Conclusion

I’d love your feedback on all this. Is there an even more efficient setup I’m missing? I’d also love to hear about your use case.

Blog

Using JavaScript to Identify Whether a Server Exists

Recently, for reasons Iā€™m sure Iā€™ll write about in the
future, I needed to find a way to use JavaScript to test if either of two
web-locations are accessible ā€“ my home intranet (which would mean the user is on
my network), or the corporate intranet of the company for which I work (which
would mean the user is on my organizationā€™s network). The page doing this test
is on the public web.

My solution for doing this test was simple. Since neither
resource is accessible publicly I put a small JavaScript file on each, then I
use AJAX and jQuery to try and fetch it. If
thatā€™s successful, I know the user has access to whichever intranet site served
the request and my page can react accordingly.

If neither request is successful I donā€™t have to do
anything, but the user doesnā€™t see any errors unless they choose to take a look
in the browser console.

This all worked wonderfully until I enabled SSL on the page
that needs to run these tests, then it immediately fell apart.

Both requests fail, because a page served over HTTPS is
blocked from asynchronously fetching content over an insecure connection. Which
makes sense, but really throws a spanner into the works for me: neither my home
nor corporate intranet sites are available outside the confines of their safe
networks, so neither support HTTPS.

My first attempt at getting around this was to simply change
the URL prefix for each from http:// to https:// and see what happened. Neither
site supports that protocol, but is the error that comes back different for a
site which exists but canā€™t respond, vs. a site which doesnā€™t exist? It appears
so!

Sadly, my joy at having solved the problem was extremely
short lived. The browser can tell the difference and reports as much in the
console, but JavaScript doesnā€™t have access to the error reported in the
console. As far as my code was concerned, both scenario was still identical
with a HTTP response code of 0 and the status description worryingly generic ā€œerror.ā€

We are getting closer to the solution I landed on, however.
The next thing I tried was specifying the port in the URL. I used the https://
prefix to avoid the ā€œmixed contentā€ error, but appended :80 after the hostname
to specify a port that the server was actually listening on.

This was what I was looking for. Neither server is capable
of responding to a HTTPS request on port 80, but the server that doesnā€™t exist
immediately returns an error (with a status code of 0 and the generic ā€œerrorā€
as the descriptive text), but the server that is accessible simply doesnā€™t
respond. Eventually the request times out with a status code of 0 but a status
description, crucially, of ā€œtimeout.ā€

From that, I built my imperfect but somewhat workable
solution. I fire a request off to each address, both of which are going to
fail. One fails immediately which indicates the server doesnā€™t exist, and the
other times-out (which I can check for in my JavaScript), indicating that the
server exists and I can react accordingly.

Itā€™s not a perfect solution. I set the timeout limit in my
code to five seconds, which means a ā€œsuccessfulā€ result canā€™t possibly come
back in less time than that. Iā€™d like to reduce that time, but when I
originally had it set at 2.5 seconds I was occasionally getting a
false-positive on my corporate network caused by, yā€™know, an actual timeout
from a request that took longer than that to return in an error state.

Nevertheless if you have a use-case like mine and you need
to test whether a server exists from the client perspective (i.e. the response
from doing the check server-side is irrelevant), I know of no other way. As for
me, Iā€™m still on the lookout for a more elegant design. Iā€™m next going to try
and figure out a reliable way to identify if the user is connected to my home
or corporate network based on their IP address. That way I can do a quick
server-side check and return an immediate result.

Itā€™s good to have this to fall back on, though, and for now
at least it appears to be working.

Blog

New Code Projects: Backblaze B2 Version Cleaner & VBA SharePoint List Library

Itā€™s been a while since Iā€™ve posted code of any description, but Iā€™ve been working on a couple of things recently that Iā€™m going to make publicly available on my GitLab page (and my mirror repository at code.jnf.me)

Backblaze B2 Version Cleaner

I wrote last week about transitioning my cloud backup to Backblazeā€™s B2 service, and I also mentioned a feature of it thatā€™s nice but also slightly problematic to me: it keeps an unlimited version history of all files.

Thatā€™s good, because it gives me the ability to go back in time should I ever need to, but over time the size of this version history will add up – and Iā€™m paying for that storage.

So, Iā€™ve written a script that will remove old versions once a newer version of the same file has reached a certain (configurable)Ā ā€œsafe age.ā€

For my purposes I use 30 days, so a month after Iā€™ve overwritten or deleted a file the old version is discarded. If I havenā€™t seen fit to roll back the clock before then my chance is gone.

Get the code here!

VBA SharePoint List Library

This one I created for work. Getting data from a SharePoint list into Excel is easy, but I needed to write Excel data to a list. I assumed thereā€™d be a VBA function that did this for me, but as it turns out I was mistaken – so I wrote one!

At the time of writing this is inĀ ā€œproof of conceptā€ stage. It works, but itā€™s too limited for primetime (it can only create new list items, not update existing ones, and each new item can only have a single field).

Out of necessity Iā€™ll be developing this one pretty quickly though, so check back regularly! Once itā€™s more complete Iā€™ll be opening it up to community contributions.

I have no plans to add functions that read from SharePoint to this library, but once I have the basic framework down that wouldnā€™t be too hard to add if youā€™re so inclined. Just make sure you contribute back!

Get the code here!

Blog

Raspberry Pi Whole Home Audio ā€“ The Conclusion?

Welcome to what is possibly the concluding post in my Raspberry Whole Home
Audio Project
series of postsā€¦ or possibly not.

At the start of this journey I had a plan to install mopidy on one of my Raspberry Pis and use pulse
audio
to stream the output to the others. Along the way I ran into some challenges
stemming from me buying the cheapest peripherals I could (and subsequently needing
to upgrade the WiFi adapters and power cables I first bought to better ones),
and my vision evolved as things progressed.

Instead of using mopidy, I switched to installing Kodi on each of the Pis thanks to the OpenElec linux distribution thatā€™s available for
several types of hardware, the Pi included.

image

Kodi, as a full-blown media centre system, might seem like a
bit of an odd choice for a headless device (i.e. something with no attached
display), but itā€™s the right choice for me for a couple of reasons.

  • I already have it installed on a couple of PCs
    in the house, attached to the TVs in the living room and the bedroom
  • I already have a remote
    control app
    for it on my phone
  • There are plugins for a bunch of stuff, such as this one for my favourite music streaming service. Well written
    plugins integrate perfectly with the system, and the remote control app.
  • It has built-in support for acting as an airplay
    receiver

For me, these things combine to provide me with the best of
both worlds. If I just want to play music from my library or from an internet
streaming service on one set of speakers, then I fire up the remote app and
target the particular device I want to output from.

If I want to play the same thing on several (or all) the
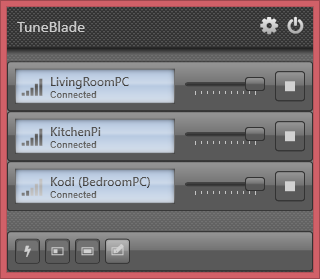
devices at the same time, then I fire up TuneBlade
on my laptop and any sounds that would usually come out of its speakers get
redirected to all the airplay receivers.

image

When it works, itā€™s glorious. Having the same music playing
in sync on all the speakers in the apartment is awesome.

The problem is that it doesnā€™t always work. TuneBlade
includes a setting that lets you set how much of a buffer you want. If you set
it too high the devices wonā€™t synchronize because it will take a slightly
different amount of time to fill the buffer on each of them. I have it set to
zero, which works amazingly well most of the time but leaves me especially
prone to blips in network connectivity and bandwidth. When these occur, things
get out of sync (which sounds terrible, because each set of speakers is not all
that far away from its neighbours), and it canā€™t seem to automatically recover ā€“
I have to manually disconnect and reconnect the affected player to get it back
in sync with its peers.

The bottom line then is that my setup is good, but not
perfect. Itā€™s no Sonos.

The search for a perfect system will likely continue, but
for the time being Iā€™m pretty content. I spent less than $100, and I have a
setup that would have cost me $5,000 from them.

Blog

The Golden Ratio: Design’s Biggest Myth

The other day I watched a Criminal Minds episode where the BAUĀ rescued some potential victims of a serial killer mathematician by using the golden ratio and the related Fibonacci sequence (or rather, by identifying and understanding the killerā€™s use of them).

It was an interesting episode. When I decided I wanted to read a little more about the golden ratio I found the article linked above, and that was an interesting read too.

Iā€™ve used the golden ratio in design (indeed, if youā€™re reading this by visiting my site on a large-screened device then the proportions of the left and right columns match the golden ratio).

Is it more aesthetically pleasing than different proportions would be? Thatā€™s the problem with things like this that are said to impact us at a subconscious level, my conscious mind doesnā€™t know.

The Golden Ratio: Design’s Biggest Myth

Blog

WebDAV Woes with Nginx, Sabre/Dav

Iā€™m in the process of moving my hosting to a new server,
because I wanted one that offers me more flexibility, and the ability to grow
the server and add resources to it during spikes in demand. Iā€™ve chosen to go
with Vultr (I recorded
a screencast
about six weeks ago showing how easy it is to set up a new
server on their platform). Iā€™ve also moved some non-essential hosting duties to
another provider altogether, CloudAtCost.

Anyway, this is not really my point.

One of the things on the server Iā€™m going to be decommissioning
is a private WebDAV store. I donā€™t use it for much, just moving the occasional
file between computers and ā€œpublishingā€ my work Outlook calendar so that I can subsequently
synchronize it back to my Google calendar and get notifications
on my wrist
. Itā€™s the WebDAV server that Iā€™ve been setting up this week.

Most of the stuff that Iā€™m moving to new servers is being
moved as-is: this is not an exercise in updating stuff, itā€™s about making sure
Iā€™m done with the old server by the time my lease on it expires, but there were
some things about the WebDAV share that I really wanted to update, so I took
the opportunity.

The main thing I wanted to achieve was to use my Windows
domain username and password
on the site. Most of my password-protected web
tools are already set up that way, but the WebDAV share was lagging behind.
Since this means I have to use ā€œbasicā€
authentication instead of the ā€œdigestā€ authentication
I previously had set
up this posed another problem. Windowsā€™ built-in WebDAV client doesnā€™t allow
basic authentication on unencrypted connections (because that means the
password is sent in the clear), so I had an SSL certificate issued. Then I
found out that the Windows WebDAV client doesnā€™t support server name
identification
, which meant some additional reconfiguration, and since I
was doing that I figured I may as well take the opportunity to update to the
latest version of sabre/dav, which is the
PHP-based WebDAV server I use (I find it much easier to set this up than to use
the built-in WebDAV functionality on web server software, which Iā€™ve never been
able to get working no matter which server software Iā€™m using).

I set all this up this week, tested it out by adding
it as a network location
on my personal and work laptops, and, once I was
satisfied it was all working well, pointed the domain name at the new server
and deleted the files from the old one.

Then I fired up Outlook, and hit the button to publish my
calendar.

It didnā€™t work.

It ended up creating a file with the right name, but a size
of zero bytes. A quick google search revealed there could be many reasons for this, and since Iā€™d
made the rookie mistake of changing everything
I really didnā€™t know where to start, not to mention that by this time Iā€™d
deleted the original files and so I couldnā€™t go backward. I tried everything,
with no success. I spent a good chunk of my day on Tuesday troubleshooting.

All along Iā€™d been convinced that the issue was with sabre/dav.
After all, all the other server functionality was working, so what other
explanation could there be for the one bit of it that sabre/dav was responsible
for being non-functional?

After a few hours though I was pretty sure that I had it set
up correctly, and I was convinced that Iā€™d either found a bug in sabre/dav or nginx. I checked the nginx logs.

2015/06/23 16:24:41 [error] 18736#0: *33 client intended to
send too large body: 1945486 bytes, client: 75.159.xxx.xxx, server: xxxxxx.jnf.me, request: "PUT /Calendars/Williams_Jason_Calendar.ics HTTP/1.1", host: "xxxxxx.jnf.me"

Dā€™oh.

All the files Iā€™d tested the share with were very small, but
my published calendar with 30 days history and 60 days of future events was
1.85mb. The server was configured to accept uploads with a maximum size of 1mb.

I added a single line to my nginx server configuration:

client_max_body_size 100m;

Done! Itā€™s so obvious when you know how.