While I was waiting for the electronic components to arrive for my DIY Smart Home project, I had the idea of adding some voice control to our house.
Plenty of people have done this with the Amazon Echo, but that’s not available in Canada yet. Google Home has now been announced of course I want one, but I don’t know when they’re going to be available in Canada either.
After a quick google search I found the article I’ve linked above about adding a custom google now command using Tasker on Android
– an app I already know and love. I set it up to trigger a call to the HomeAssistant API.
It’s been a little while since I posted about my smart home journey because I’ve been pretty busy of late with other things (like my actual job), but rest assured that there has been progress – albeit slow.
As I mentioned before, I’ll be adding three microcontrollers to our smart home setup in various parts of the house. Each project is going to go through three stages: proof of
concept, prototype, and final product.
Today is our first proof of concept, and it’s going to test whether or not I can hook our existing doorbell up to WiFi.
Getting a notification when someone rings the doorbell was the first thing Flo asked for when I mentioned I was going to start making our home smarter, and I quickly set
about figuring out how to do it: happy wife, happy life.
Some initial ideas (adding a relay to the doorbell circuit) were fairly quickly dismissed, and so I came up with a piece of out of the box thinking that I’m actually very proud of.
I’ll be using magnetic switches, also known as reed switches, elsewhere in the house. In fact, we already have them on many of the doors and windows as part of our burglar alarm, and you may well have some in your house too. They work by opening and closing when a magnet is brought into proximity with the switch. My flash of inspiration came when I was thinking about how a doorbell works: an electromagnet pulls a hammer into one chime when the doorbell is pushed, and then a spring pushes it into a second chime when the button is released and the electromagnet turns off. So, if I put a reed switch next to the electromagnet then the switch will flip when the magnet
turns on. Genius!
Happily for me, our doorbell has two chimes: one in the main floor hallway, and one in the basement. I wouldn’t want to run cables up the wall to the chime on our main floor, but the basement one is the mechanical room so the aesthetic is really not a consideration.
Using a switch as an input for the NodeMCU is simple. Really the only thing to think about is that the digital input pins are “floating,” which means that if nothing is connected then the result you get from them is unpredictable. To account for this you use either a “pull up” resistor between the input pin and the 3.3v pin, or a “pull down” resistor between the input pin and the ground pin. I went for a pull down resistor between the input pin and ground, then put the switch between the input pin and 3.3v.
For the proof of concept I wrote some simple code to display the input pin state over the serial console, taped the reed switch place and, despite some protest from the dog, rang the doorbell a few times.
If you’ve been keeping up with my #SmartHome series (and if you haven’t, why not?) you’ll already know that I have plans to make more of my home “smart” using Home
Assistant as the software that ties everything together, and some DIY NodeMCU-based hardware that I’m going to build myself as a learning opportunity.
Another important piece of the puzzle, but one that I haven’t previously mentioned, is MQTT.
MQTT is “a publish-subscribe-based lightweight messaging protocol for use on top of the TCP/IP protocol,” at least according the slightly suspect grammar of the person that wrote the Wikipedia article about it.
I learned about MQTT at the same time I learned about Home Assistant, although I didn’t initially appreciate its power. I’ve been using it from the start to enable Home Assistant to know where we are: our phones run an app called OwnTracks which publishes
location data to an MQTT “broker” (server). Home Assistant subscribes to these updates, which means it immediately knows about it when our location changes.
I love this whole solution, not least because it’s very easy to run my own MQTT broker (I’m running Mosquitto in a Docker container on my home server) and I’m therefore entirely in control of our location data – it’s not being shared with the developer of some app or service I have no insight into.
This publish/subscribe model and the lightweight nature of MQTT makes it perfect for “Internet of Things” (IoT) devices to communicate with each other, and when you add Home Assistant into the mix it gives me all the tools I need for any sensors I build
to feed their data into my smart home ecosystem, and for my smart home controller to feed commands to any devices.
Indeed, I’ve already built my first little NodeMCU app that leverages the technology.
I’ve ordered almost all the components I need for my upcoming hardware projects from China, and they’re only just starting to arrive. Happily the NodeMCUs themselves were amongst the first shipments to land on my doorstep, so even though the only thing I can really do with them right now is programmatically turn their internal LED on and off, I have still been able to use this to start learning: I’ve made it an internet controlled
LED.
As promised, I’m going to be sharing both the hardware and the software as I take this DIY Smart Home journey. There is no DIY hardware here, just the NodeMCU itself, but I’ve published both the Arduino sketch and Home Assistant configuration I’ve used for the video.
Ever since I bought my own home nearly a year ago, I’ve
become increasingly interested in making it smart.
Right off the bat, I feel like I should clarify what that
means to me. The ability to turn some lights on or off with an app is not
smart, in my opinion – the smart way of controlling lights is by flicking a
switch conveniently located in the room you wish to illuminate.
A smart home needs to be much more intelligent. It’s about
automation. It’s about the home being able to notify me if something is
happening that I need to know about. It’s about being able to accomplish things
with minimal difficulty, not adding complexity and more steps.
That’s where off the shelf “smart home” solutions really
started to fall down for me. I could spend hundreds or maybe even thousands of
dollars, for what? The ability to turn on my living room lights while I’m still
at the office? Why would I ever need to do that?
Nevertheless, the lack (in my opinion) of a pre-packaged,
useful, holistic solution that accomplished my vision of what a “smart home”
should be didn’t deter me from tackling things bit by bit. It started with our
burglar alarm. It has internet connectivity which sends me alerts in the event
that something unexpected is happening, and lets me arm or disarm the system
from my phone – which I actually do find useful.
Next up was our thermostat. The one that was installed when
we bought the house was an old-fashioned one with a simple mercury switch
inside. You set the temperature, and that was it. We replaced that about a
month ago with something programmable (it doesn’t need to be as warm in here at
night as it does during the day; it doesn’t need to be as warm if nobody’s
home), and I took the opportunity to get one with WiFi so I can set the
temperature remotely. That’s not useful in and of itself, but if you take that
functionality and look at it in the context of my wider vision then the
thermostat is certainly something I’d like to be able to programmatically
control.
It was around this same time that I discovered home assistant, and now my dream is
starting to come alive.
Home Assistant is an open-source project that runs on a
variety of hardware (I was originally running it on a Raspberry Pi, and I’ve
since switched to running it in a Docker
container on our home
server). It has a ton of plugins
(“components”) that enable it to support a variety of products – including our
existing alarm, thermostat, streaming media players, and others (including,
somewhat ironically, the colour-changing lightbulbs we have in our family
room). It includes the ability to create scripts and automations, it uses our
cellphones to know our locations, and can send us push notifications.
My initial setup was all about notifications. If we both
leave the house but the burglar alarm isn’t set then it tells us (and provides
an easy way to fix the issue). If we leave one of the exterior doors open for
more than five minutes, it notifies us (or just one of us, if the other is
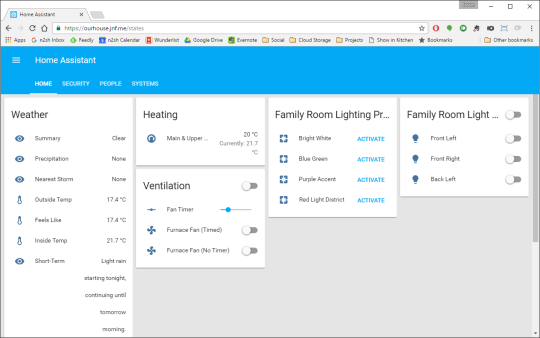
out). I also created a dashboard (that you may have seen in my last post) to display some of this stuff on a monitor in my office.
Since installing the thermostat I’ve added more automation.
The time we go to bed isn’t always predictable, but when we do go to bed we set
the alarm. So, if it’s after 7pm and the alarm goes from disarmed to armed, the
thermostat gets put into night mode. If nobody is home then the temperature
gets gradually turned down based on how far away we are.
If nobody is home at dusk then it turns on some lights and
streams talk radio through the family room speakers to give the impression that
someone is.
This stuff meets my definition of smart, and I’m barely
scratching the surface. The open nature of the platform not only means that I’m
not tied to a particular vendor or technology, but also means that I can add on
to the system in a DIY way.
Which is exactly what I’m going to do. I’ve bought some NodeMCU microcontrollers which are
WiFi enabled, Arduino IDE-compatible
development boards designed to the basis for DIY electronics projects.
Watch this space, because over the coming months I’ll be
connecting our doorbell, garage door and laundry appliances to Home Assistant.
I’ll be learning as I go, and I’ll share the hardware and software.
Recently, I have been all about turning our home into a smart home. That’s mostly because I’ve discovered Home Assistant: a little piece of software that runs (in my case) on a Raspberry Pi and pulls together data from all the sensors and smart devices you own.
Apart from a new WiFi thermostat that I was going to buy anyway I haven’t yet spent any money at all in my quest for this – I’ve merely connected together the devices we already owned (Chromecasts; family room lights; our burglar alarm), added in some data available through various APIs (weather; internet speed; server status) and pulled location information from our phones using an app that publishes the information to my own server.
Anyway, now that I have all this information in one place I wanted an attractive way to display it in my office. Happily I’d already bought a monitor with a built-in powered USB hub from a surplus equipment sale a while back, with this kind of project in mind.
So, my Friday afternoon project today became hooking up another Raspberry Pi to this monitor and crafting a HTML dashboard for it to display. Not everything works yet, but I think it’s pretty good for an afternoon’s work.
(Since I didn’t remove the clock from the frame when I shot the video, I can’t pretend this thing is quick to boot. I may have manipulated the video speed at a couple of points. But anyway).
Oh, and watch this space for some home-brew smart home devices, coming soon!