Welcome back to my series of posts on SharePoint development!
At the end of lesson one we’d used some basic HTML, javascript and jQuery skills to create a tool for calculating shipping costs, and we’re hosting the tool on our team SharePoint site so that everybody who needs it has access.

This is great and all, but as we noted – it doesn’t exactly feel like our tool is a part of SharePoint. That might be fine if we’d built something extremely complex where having it as a self-contained webapp of sorts made a lot of sense, but it seems wrong for our purposes.
What we need to do is somehow build the tool into the main page of our SharePoint site so our users don’t even have to think if they want to use it – it’s just right there waiting for them.
The Content Editor Web Part
Believe it or not, we laid the groundwork for this in lesson 1 even without knowing it. The final step last time was to add a content editor web part to our page with a link to the tool in it.
The content editor webpart is much more powerful than that though, and we’ve barely scratched the surface. First, let’s take a closer look at what we have there already.

From the web part’s menu, choose the Edit Web Part option. An options pane will appear on the right of the screen.
If you’re using SharePoint 2007 there’s a button in the options pane called Source Editor, and this is where you’ll want to go. On SharePoint 2010 you’ll need to click into the web part first of all so that the ribbon appears at the top of the screen, then select HTML and Edit HTML Source from the Format Text ribbon.
Right now, my source looks like this:
<a class="ms-rteFontSize-7" href="/web/shipping.aspx">Shipping Cost Calculator</a>
Simple enough, but hopefully you’re beginning to see where I’m going with this. The content of the web part is rendered inline as part of the HTML of the overall page, and we can put whatever we want in there. We can only edit this one snippet of the page where the web part lives, but that’s OK – it’s good enough.
Last time we included a reference to the jQuery library in the <head> section of the page, but does it actually need to be in the head? It may not be semantically great code, but we can put that reference anywhere. And once we have we’ll have all the power of jQuery at our disposal to manipulate the main page of the site however we see fit.
For now, let’s modify the code we used in lesson one to make it appropriate for inclusion in the middle of a page:
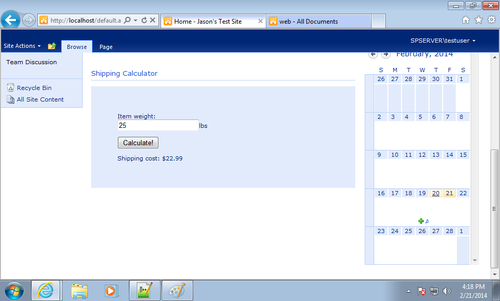
/web/js/jquery-1.11.0.min.js $(document).ready(function() { $('input#calculate').click(function() { var shippingcost = 19.99; if ($('input#itemweight').val() > 20) { shippingcost += (Math.ceil(($('input#itemweight').val() - 20) / 5) * 3); } $('span#shippingcost').html(shippingcost); }); });Item weight:
lbsShipping cost: $0
Paste that in to the content editor web part’s source, and save. On my installation of SharePoint 2010 a warning pops up telling me my HTML may have been edited. I don’t know why SharePoint feels the need to do this, but it doesn’t seem to matter.
Our shipping cost calculator is now looks like it’s really a part of our site homepage, and we’re done another quick lesson!
Taking it Further
What we’ve done here is great for our purposes, but we’ve actually opened up a world of extra possibility here.
As I noted, the HTML and javascript we’ve pasted into our content editor web part goes directly into the page, inline. In some respects that’s not the best – we have script tags in the middle of the page which isn’t really the correct approach, but in other ways it’s extremely powerful.
We can use our script to manipulate the page however we choose. If the approach we’ve chosen to take is to include our code in a web part then we probably don’t want to go nuts and change everything, but if you want to manipulate, say, the document’s title? Easy!
document.title = 'Site Home and Shipping Calculator'
If you want to include a custom CSS file? Done!
$("head").append("<link rel='stylesheet' href='/web/css/example.css' type='text/css' media='screen'>");
And if you have another web part that you want to use jQuery in, there’s no need to include a second reference to the library – one per page is all you need. You can easily have one content editor web part that influences another.
Conclusion
So, in lesson one we built a simple tool and now in lesson two we’ve integrated it right into our SharePoint page. There’s a lot you can do with this knowledge. In lesson three we’ll go deeper still though, and begin to use data from SharePoint lists in our tool with the help of the SPServices jQuery add-on.