You’ve probably heard of SSL, or at least know it from either the https:// prefix that you see when browsing certain websites or the padlock icon in your browser’s address bar that goes along with it.

You probably also know that this icon’s presence is an absolute must when you’re doing sensitive things on the internet, like online banking. Really though you should consider it a must on any site where you’re entering information that you wouldn’t want falling into the wrong hands – including your username and password for the site itself and anything you do on the site once you have logged in.
SSL does two important things: It encrypts the connection between your browser and the site’s webserver, meaning that if somebody had the ability to listen in to your internet traffic (which is actually frighteningly easy, especially if you’re using a public WiFi hotspot) then they won’t actually see any of your important personal details. SSL also provides identity verification for websites in order to thwart a more complex attack where your web traffic is somehow redirected to a fake version of the site. Today we’re going to tackle only the first part – encrypting the connection between the browser and my webserver, which is running lighttpd.
Recently I’ve created a web interface that allows me access to my documents from anywhere on the web. To log in I have to enter my user ID and password for my home network, and once I’m logged in I may want to open a file that includes some sensitive information. This whole interaction is something that should be protected end to end by SSL, so that’s precisely what I’m going to do.
Creating an SSL Certificate
Of the two things SSL can do for us (securing a connection and confirming the identity of the webserver we’re connected to), the first part is actually much easier than you might think. The problem (as we’ll discover), is that doing only that first part has some problems that make it unsuitable for a typical public website. More on that later, but in my scenario where I have a website that’s intended only for my use this will be an acceptable solution, and that’s what we’re going to do.
On the webserver, navigate to a directory where you’re going to store the SSL certificate file. This directory should not be web-accessible. We’re going to use OpenSSL to create our SSL certificate. OpenSSL is unfortunately best known for introducing the heartbleed bug that caused a panic in the not too distant past, so before you proceed make sure the version you have is not affected. The step we’re about to complete actually won’t be impacted even if your server is vulnerable to heartbleed, but the day to day use of any certificate on a vulnerable server is not safe.
Ready? Good. Type the following command:
openssl req -new -x509 -keyout server.pem -out server.pem -days 365 –nodes
OpenSSL will ask a few questions, the answers of which will form a part of the certificate we’re generating (and be visible to site visitors, if they choose to go looking for it). Everything is fairly self-explanatory with the possible exception of the Common Name field. Since we’re going to be using this certificate for web-based SSL, the Common Name must be the hostname (the full domain name, including the www prefix if you use it) of your website.
Country Name (2 letter code) [AU]:CA
State or Province Name (full name) [Some-State]:Alberta
Locality Name (eg, city) []:Calgary
Organization Name (eg, company) [Internet Widgits Pty Ltd]:JnF.me
Organizational Unit Name (eg, section) []:Hosting and web services
Common Name (eg, YOUR name) []:www.ssl-example.jnf.me
Email Address []:[email protected]
You’ll find that you now have a file called server.pem in your working folder, and that’s it! This is your SSL certificate that will be used to secure the connection.
Enabling SSL in Lighttpd
Now we need to configure our webserver to use SSL with the certificate we’ve just generated. As I noted, my webserver is lighttpd. If you’re using Apache, IIS, Nginx or something else then the steps you need to follow will be different.
For lighttpd, open up your lighttpd.conf file (typically found in /etc/lighttpd) and adjust your configuration similar to the following:
$SERVER["socket"] == ":80" {
   url.redirect = ("^/(.*)" => "https://www.ssl-example.jnf.me/$1")
}

$SERVER["socket"] == ":443"
   ssl.engine = "enable"
   ssl.pemfile = "/path/to/server.pem"
   server.document-root = "/path/to/web-root"
}
The first section identifies any traffic that reaches port 80 on our webserver (http), and redirects the user to the https version of the site. The second section applies to traffic reaching port 443 (https), enables lighttpd’s SSL engine and provides the paths to the server.pem file that we generated, and the appropriate content.
Restart lighttpd for the changes to take effect:
sudo /etc/init.d/lighttpd restart
And that’s it! Traffic to our site is now encrypted using SSL.
Identity Verification
As I alluded to earlier in the article though, there’s a problem. When you navigate to the site in your browser you see (depending on your browser of choice) something similar to the following on your screen.
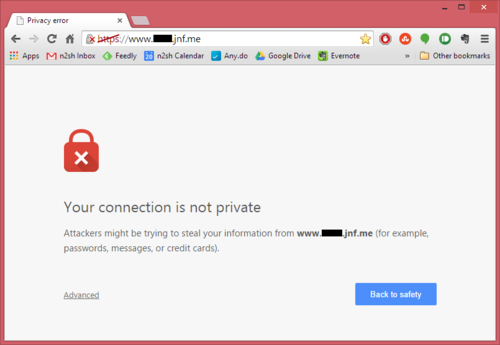
It’s not particularly specific, but clearly Chrome has an issue with our setup.
The problem here is the one I alluded to earlier, and if you click the padlock icon in the address bar then Chrome will give you some additional details that show you what I mean.
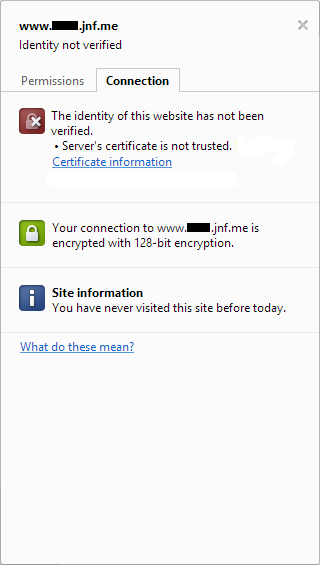
Our connection is indeed secured by SSL as we’d hoped, but Chrome has been unable to verify the identity of the website we’re connecting to. This is not a surprise – since we created the SSL certificate ourselves, our browser has no means of knowing if the certificate should be trusted or not. This is why self-signed certificates are not suitable for public, production websites.
Since this is site is going to me for my use only, I can live with it. The important thing is that my connection is encrypted, and if I hit the Advanced link then I have an option to ignore the warnings and proceed to the site. I don’t want to do that every time if I can avoid it though, and the solution is to add the site’s SSL certificate to your computer’s Trusted Root Certificate Authorities store. Chrome (on Windows) and Internet Explorer both use this same location when checking the validity of SSL certificates, so the easiest way to go about doing this is actually to open the site in Internet Explorer and then complete the following steps which I took from a helpful user on stackoverflow:
- Browse to the site whose certificate you want to trust.
- When told There is a problem with this website’s security certificate, choose Continue to this website (not recommended).
- Click on Certificate Error at the right of the address bar and select View certificates.
- Click on Install Certificate… then in the wizard, click Next.
- On the next page select Place all certificates in the following store.
- Click Browse, select Trusted Root Certification Authorities, and click OK.
- Back in the wizard, click Next, then Finish.
- If you get a security warning message box, click Yes.
- Dismiss the message box with OK.
- Restart your computer.
- When you return to the site in either internet explorer or Chrome, you should find that the certificate is now trusted.
All done!